Manual/Area Lamp
From BlenderWiki
Contents[hide] |
Area Lamp
Mode: All Modes
Panel: Shading/Lamp Context
Hotkey: F5
Description
The Area
lamp simulates light originating from surface (or surface-like)
emitters, for example, a TV screen, your supermarket's neons, a window
or a cloudy sky are just a few types. The area lamp produces shadows
with soft borders by sampling a lamp along a grid the size of which is
defined by the user. This is in direct contrast to point-like artifical
lights which product sharp borders.
Options
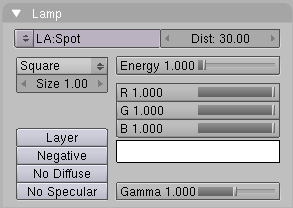
- Dist
- The area lamp's falloff distance. This is much more sensitive and important for area lamps than for other lamps, usually any objects within the range of Dist will be blown out and overexposed. For best results, set the Dist to just below the distance to the object that you want to illuminate.
- Gamma
- Amount to gamma correct the brightness of illumination. Higher values give more contrast and shorter falloff.
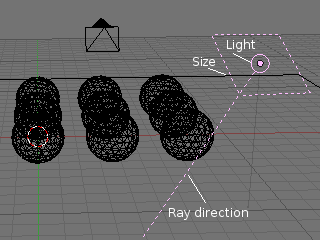
The Area light replaces the Quad and Sphere buttons with Shape and Size controls. The first one lets you choose the shape of the area and the second the size of the shape.
- Square
- Emit light from a square area
- Size
- The width of the square's edge
- Rect
- Emit light from a rectangular area
- SizeX
- The rectangle's horizontal width
- Size Y
- The rectangle's vertical height
| Shape Tips: Choosing the appropriate shape for your Area Light will enhance the believability of your scene. For example, you may have an indoor scene and would like to simulate light entering through a window. You could place a Rect area lamp in a window (vertical) or from neons (horizontal) with proper ratios for SizeX and SizeY. For the simulation of the light emitted by a TV-screen a vertical Square area lamp would be better in most cases. |
Shadows
Area lamps can make soft shadows, using raytracing with a number of samples. For more, detailed information see the Raytraced shadows sections.
Examples
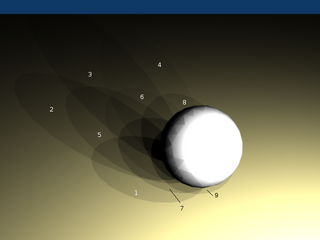
In (Render example), only one sphere is visible in order to emphasize the shadows created by the Area light. Here the Samples has been set to 3 which will generate 3*3 or 9 shadows. In addition, the Size of the square has been made relatively large (30) in order to exaggerate the shadows displaced from each another; the numbers are marked in an arbitrary order. Think of the Size as pushing the lights away from each other in the plane of the square.
Technical Details
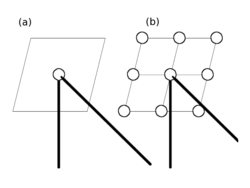
The following picture (Principles behind the Area Light) helps to understand how the soft shadows are simulated.
(a) is the Area Light as defined in Blender. If its shape is Square, then the softness of the shadow is defined by the number of light Samples in each direction of the shape. For example, (b) illustrates the equivalent case of an Area Light (Square shape), with Samples set at 3 on the Shadow and Spot panel; see Area Light Buttons section.
The Area Light is then considered as a grid with a resolution of 3 in each direction, and with a Light dupliverted at each node for a total of 9 Lights.
In case (a) the energy is "Energy (E)"/1 and in case (b) the Energy of each individual equivalent Light is equal to E/(No of lights). Each Light produces a faint shadow (proportional to the Energy of the Light), and the overlay of the shadows produces the soft shadows (they are darker where the individual shadows overlap, and lighter everywhere else).
Hints
You will note that changing the Size parameter of your area lamp doesn't affect the lighting intensity of your scene. On the other hand, rescaling the lamp using the S in the 3D View could dramatically increase or decrease the lighting intensity of the scene. This behavior has been coded this way so that you can fine tune all your light settings and then decide to scale up (or down) the whole scene without suffering from a drastic change in the lighting intensity. If you only want to change the dimensions of your Area lamp, without messing with its lighting intensity, you are strongly encouraged to use the Size buttons instead.
With equal Energy and Dist values, an area lamp and a regular lamp will not light the scene with the same intensity. The area lamp will have a tendancy to 'blow out' the highlights, but this can be corrected using the Exp slider in the World buttons.
See Also
|


