Manual/Array Modifier
From BlenderWiki
Contents[hide] |
Array Modifier
Mode: Any Mode
Panel: Editing Context → Modifiers
Hotkey: F9
Description

The Array modifier creates an array of copies of the base object, with each copy being offset from the previous one in a number of possible ways. Vertices in adjacent copies can be merged based on a merge distance, allowing smooth subsurf frameworks to be generated.
This modifier can be useful when combined with tilable meshes
for quickly developing large scenes. It is also useful for creating
complex repetitive shapes.
Options

- Constant Offset, X, Y, Z
- Adds a constant translation component to the duplicate object's offset. X, Y and Z constant components can be specified.
- Relative Offset, X, Y, Z
- Adds a translation equal to the object's bounding box size along each axis, multiplied by a scaling factor, to the offset. X, Y and Z scaling factors can be specified. See (Relative offset example).
-
 Relative offset example

- Object Offset, Ob
- Adds a transformation taken from an object (relative to the current object) to the offset. See (Object offset example).
-
 Object offset example


- Length Fit menu
- Controls how the length of the array is determined; see (Length Fit menu). There are three choices. One of Ob, Length or Count will be displayed to allow entry of the appropriate parameter depending on the choice selected:
- Fit To Curve Length - Generates enough copies to fit within the length of the curve object specified in Ob
| Note: Fit To Curve Length uses the local coordinate system length of the curve, which means that scaling the curve in Object mode will not change the number of copies generated by the Array modifier. Applying the scale (Ctrl A) can be useful in this case. |
- Fixed Length - Generates enough copies to fit within the fixed length given by Length
- Fixed Count - Generates the number of copies specified in Count
| Note: Both Fit To Curve Length and Fixed Length use the local coordinate system size of the base object, which means that scaling the base object in Object mode will not change the number of copies generated by the Array modifier. Applying the scale (Ctrl A) can be useful in this case. |
- Ob
- The Curve object to use for Fit To Curve Length.
- Length
- The length to use for Fixed Length.
- Count
- The number of duplicates to use for Fixed Count.
- Merge
- If enabled, vertices in each copy will be merged with vertices in the next copy that are within the given merge distance.
- First Last
- If enabled and Merge is enabled, vertices in the first copy will be merged with vertices in the last copy (this is useful for circular objects; see (First Last merge example)).
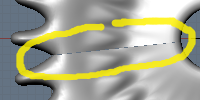
Subsurf discontinuity caused by not merging vertices between first and last copies (First Last off)
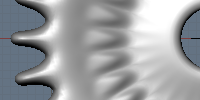
Subsurf discontinuity eliminated by merging vertices between first and last copies (First Last on)
First Last merge example


- Merge Dist
- Controls the merge distance for Merge Verts.
Hints
Offset Calculation
The transformation applied from one copy to the next is calculated as the sum of the three different components (Relative, Constant and Object), all of which can be enabled/disabled independently of the others. This allows, for example, a relative offset of (1, 0, 0) and a constant offset of (0.1, 0, 0), giving an array of objects neatly spaced along the X axis with a constant 0.1 unit of space between them.
Examples
Bridge

| Note: As the Curve modifier could not be after Array in the modifier stack at the time this image was created, the Array modifier was applied (i.e. the "Apply" button was pressed) before the curve was added in the bridge image. |
Chain

Sample blend file
Cog

Sample blend file
Crankshaft

Sample blend file
Fractal

Sample blend file

Organic


Sample blend file

Sample blend file
|
