Manual/Camera View
From BlenderWiki
Contents[hide] |
Add a new camera
In object-mode simply press space and in the popup menu, choose Add-->Camera. New cameras are directed in parallel with the current viewport.
Change active camera
Mode: Object Mode
Hotkey: Ctrl NUM0
Active camera is the camera that is currently used for rendering. Select the camera you would like to make active and press Ctrl NUM0 (by doing so, you also switch the view to camera view). In order to render, each scene must have a camera.
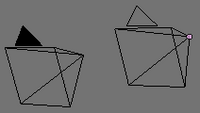
The active camera is the one with the filled Up triangle on top seen in the 3D viewport. The left camera in the picture.
Move active camera to view
Mode: Object Mode
Hotkey: Alt Ctrl NUM0
Moves the selected camera to current 3D view. Select a camera and then move around in 3D view to a desired position and direction for your camera. Now press Alt Ctrl NUM0 and your selected camera positions itself at your spot and switches to camera view.
Camera Settings
Cameras are invisible in a scene; they are never rendered, so they don't have any material or texture settings. However, they do have Object and Editing setting panels available which are displayed when a camera is the active (selected) object.
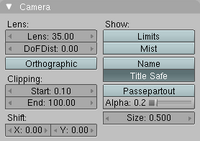
- Lens - Represents the lens in mm. If Orthographic is selected, this will change to a Scale variable.
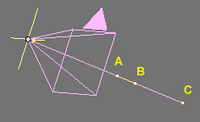
- DoFDist - Distance to the point of focus. It is shown as a yellow cross on the camera line of sight. Limits must be enabled to see the cross. It is used in combination with the Defocus Node
- Orthographic - Toggles Orthographic mode for rendering. See Manual/Using the 3D View for a more detailed description on Orthographic mode.
- Clipping Start/End - Sets the clipping limits. Only objects within the limits are rendered. If Limits is enabled, the clipping will be seen as two yellow dots on the camera line of sight. C on the Camera picture. The first is at Camera origin.
- Shift X/Y - Shifts the camera viewport.
- Limits - Toggles viewing of the limits on and off.
- Mist - Toggles viewing of the mist limits on and off. The limits are shown as two white dots on the camera line of sight. A and B on the Camera picture. The mist limits are set in the World Panel F8.
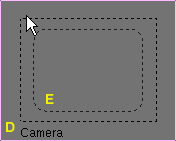
- Name - Toggle name on and off. D on the Camera View picture.
- Title Safe - When title safe is enabled an extra dotted frame is drawn inside the camera viewport. Shown beside E.
- Passepartout Alpha - This mode draws the area outside of the camera's field of view with a different darkness, set by the Alpha setting.
- Size - The draw size of the camera in the 3D view. This doesn't affect the camera's output, it is just a convenience to enable easier selection of the camera object in the viewport. (The camera object can also be scaled using the standard S transform key).
Camera Navigation
To control the camera while viewing through it NumPad 0:
Aiming the camera
Press Shift F to enter "Camera Fly Mode", then move the mouse around to aim the camera, LMB ![]() to set the new orientation, RMB
to set the new orientation, RMB ![]() or ESC to cancel.
or ESC to cancel.
Rolling
To roll the camera, the camera needs to be selected (while viewing throught it, RMB ![]() on the solid rectangular edges selects it), then press R to enter standard object rotation mode, the default will be to rotate the camera in it's local Z axis.
on the solid rectangular edges selects it), then press R to enter standard object rotation mode, the default will be to rotate the camera in it's local Z axis.
Pitch
To rotate along the local X axis, press R, then XX. The first X (or Y or Z for other axis) selects the global axis, pressing the "axis letter" a second time selects the local axis (this works when rotating any object).
Dolly
To dolly the camera, press G then MMB ![]() , LMB
, LMB ![]() to complete.
to complete.
Track Camera
Press G(rab) and move the mouse ( LMB ![]() to set position).
to set position).
|


