Manual/Decimate Modifier
From BlenderWiki
Contents[hide] |
Decimate Modifier
Mode: Object Mode
Panel: Editing Context → Modifiers
Hotkey: F9
This sub-panel appears in the Editing Context panel group which is accessed using F9 or clicking ![]() button in the Buttons window. This sub-panel is part of the Modifier parent panel. For further information about the common panel components see the Modifier Stack section.
button in the Buttons window. This sub-panel is part of the Modifier parent panel. For further information about the common panel components see the Modifier Stack section.
Description
The Decimate modifier allows you to reduce the vertex/face count of a mesh with minimal shape changes. This is not applicable to meshes which have been created by modeling carefully and economically, where all vertices and faces are necessary to correctly define the shape, but if the mesh is the result of complex modeling, with proportional editing, successive refinements, possibly some conversions from SubSurfed to non-SubSurfed meshes, you might very well end up with meshes where lots of vertices are not really necessary.
The Decimate Modifier is a quick and easy way of reducing the polygon count of a mesh non-destructively. This modifier demonstrates of the advantages of a mesh modifier system because it shows how an operation, which is normally permanent and destroys original mesh data, can be done interactively and safely using a modifier.
Unlike the majority of existing modifiers, the Decimate Modifier does not allow you to visualize your changes in edit mode.
The Decimator tool only handles triangles, so each quadrilateral face is implicitly split into two triangles for decimation.
Options
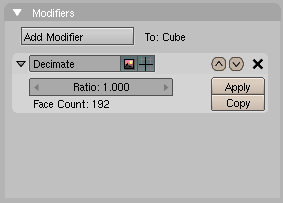
- Ratio
- The percentage of faces to keep after decimation, from 0.0 (0%, all faces have been completely removed) to 1.0 (100%, mesh is completely intact, except quads have been triangulated).
As the percentage drops from 1.0 to 0.0 the mesh becomes more and more decimated until the mesh no longer visually looks like the original mesh. - Face Count: (Display only)
- This field shows the number faces as a result of applying the Decimate Modifier.
Examples
Simple plane
A simple example is a plane, and a 4x4 undeformed Grid object. Both render exactly the same, but the plane has 1 face and 4 vertices, while the grid has 9 faces and 16 vertices, hence lots of unneeded vertices and faces. The Decimate Modifier allows you to eliminate these unneeded faces.
Decimated cylinder
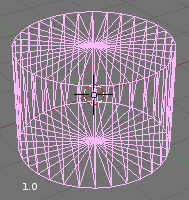
We take a simple example of decimating a cyclinder using the default of 32 segments. This will generate a cyclinder with 96 faces. When the Decimate Modifier is applied (Decimate applied) the face count goes up! This is because the Modifier converts all quadrilaterals into triangles (tris) which always increases the face count. Each quadrilateral (quads) decomposes into two triangles.
The main purpose of the Decimate Modifier is to reduce mesh resources through a reduction of vertices and faces, but at the same time maintain the original shape of the object.
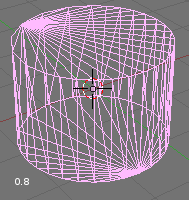
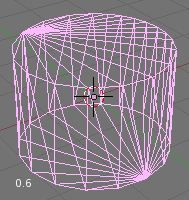
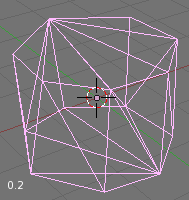
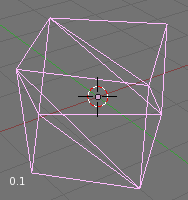
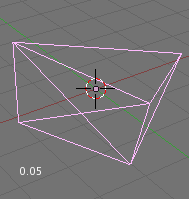
Each of the following images has had the percentage dropped in
each successive image, from 1.0 to 0.05. Notice that the face count has
gone from 128 to 88 at 0.6% and yet the cyclinder continues to look
very much like a cylinder and we discarded 40 unneeded faces.
As you can see when the percentage has reached 0.1 the cylinder looks more like a cube. And when it has reached 0.05 it doesn't even look like a cube!
Once you have reached the face count and appearance you were looking for you can "Apply" the modifier. If you want to convert as many of the tris back to quads to reduce mesh resources further you can use (Alt J) while in Edit mode.
High resolution landscape
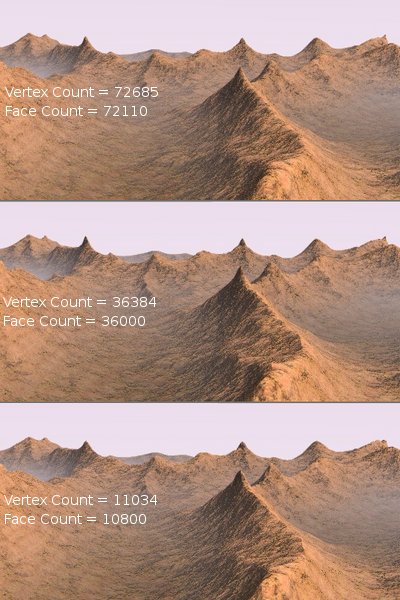
Decimated landscape, top: original; middle: lightly decimated; bottom: heavily decimated. shows a landscape generated via a careful application of the Noise technique described earlier, on a quite vast grid. On top, the result for the original mesh and below, two different levels of decimation. To the eye the difference is indeed almost unnoticeable, but as the vertex count goes down there is a huge gain.
|
