Manual/Diffuse Shaders
From BlenderWiki
Contents[hide] |
Diffuse Shaders
Mode: All Modes
Panel: Shading/Material Context → Shaders
Hotkey: F5
Description
A diffuse shader determines, simply speaking, the general colour of a material when light is shined on it. Most shaders that are designed to mimic reality give a smooth falloff from bright to dark from the point of the strongest illumination to the shadowed areas, but Blender also has other shaders for various special effects.
Options
All diffuse shaders have the following options:
- Color
- The base Diffuse color of the material
- Ref
- The shader's brightness, or more accurately, the amount of incident light energy that is actually diffusely reflected towards the camera.
Technical Details
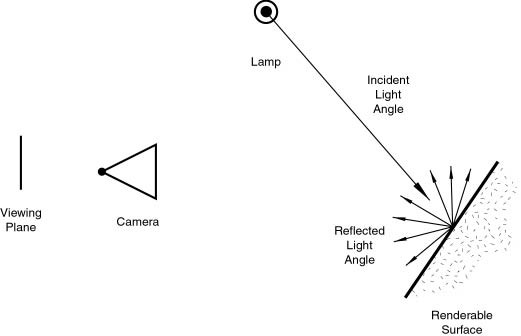
Light striking a surface and then re-irradiated via a Diffusion phenomenon will be scattered, i.e., re-irradiated in all directions isotropically. This means that the camera will see the same amount of light from that surface point no matter what the incident viewing angle is. It is this quality that makes diffuse light viewpoint independent. Of course the amount of light that strikes the surface depends on the incident light angle. If most of the light striking a surface is reflected diffusely, the surface will have a matte appearance (Light re-irradiated in the diffusion phenomenon.).
Hints
Some shaders' names may sound odd - they are traditionally named after the people who invented them.
Lambert
Mode: All Modes
Panel: Shading/Material Context → Shaders
Hotkey: F5
Description
This is Blender's default diffuse shader, and is good general all-around work horse...neigh!
Options
This shader has only the default option, determining how much of
available light is reflected. Default is 0.8, to allow some other
objects to be brighter.
Oren-Nayar
Mode: All Modes
Panel: Shading/Material Context → Shaders
Hotkey: F5
Description
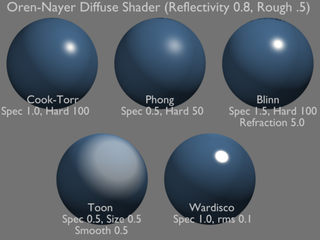
Oren-Nayar takes a somewhat more 'physical' approach to the diffusion phenomena as it takes into account the amount of microscopical roughness of the surface.
Options
- Rough
- The roughness of the surface, and hence, the amount of diffuse scattering
Toon
Mode: All Modes
Panel: Shading/Material Context → Shaders
Hotkey: F5
Description
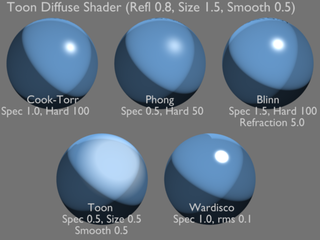
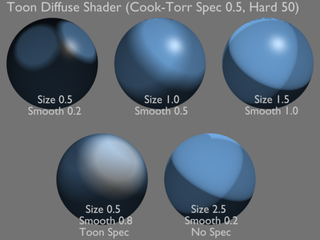
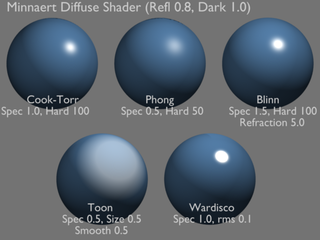
The Toon shader is a very 'un-physical' shader in that it is not
meant to fake reality but to produce cartoon cel styled rendering, with
clear boundaries between light and shadow and uniformly lit/shadowed
regions.
Options
- Size
- The size of the lit area
- Smooth
- The softness of the boundary between lit and shadowed areas
Minnaert
Mode: All Modes
Panel: Shading/Material Context → Shaders
Hotkey: F5
Description
Minnaert works by darkening parts of the standard Lambertian shader, so if Dark is 1 you get exactly the Lambertian result. Higher darkness values will darken the center of an object (where it points towards the viewer). Lower darkness values will lighten the edges of the object, making it look somewhat velvet.
Options
- Dark
- The darkness of the 'lit' areas (higher) or the darkness of the edges pointing away from the light source (lower).
Fresnel
Mode: All Modes
Panel: Shading/Material Context → Shaders
Hotkey: F5
Description
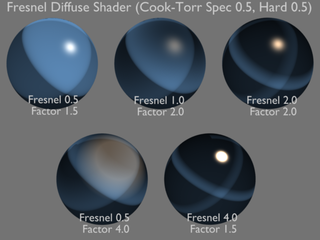
With a Fresnel Shader the amount of diffuse reflected light depends on the incidence angle, i.e. from the direction of the light source. Areas pointing directly towards the light source appear darker, areas perpendicualr to the incoming light become brighter.
Options
Ref is the Reflectivity; amount of color reflected for each unit of
light received. Fresnel is the power of the fresnel effect, and Fac is
the amount of the effect to blend in.
|
