Manual/Groups and Parenting
From BlenderWiki
Contents[hide] |
There can be many objects in a scene: A typical stage scene consists of furniture, props, lights, and backdrops. Blender helps you keep everything organized by allowing you to group like objects together.
When modelling a complex object, such as a watch, you may
choose to model the different parts as separate objects. However, all
of the parts may be attached to each other. In these cases, you want to
designate one object as the parent of all the children. Movement and
rotation of the parent also affects the children.
Parenting objects
Mode: Object mode
Hotkey: Ctrl P
Menu: Object → Parent → Make Parent
Description
To parent objects, select at least two objects, and press Ctrl P. A confirmation dialog will pop up asking Make Parent. Selecting Make Parent confirms and the group is created; see (Make Parent). The last object selected (active object outlined in pink) will be the parent object. If you selected multiple objects before selecting the parent, they will all be children of the parent and will be at the same level of the hierarchy.
Moving and rotating the parent will also automatically move/rotate the child.
Mode: Edit mode
Hotkey: Ctrl P
Menu: Mesh → Vertices → Make Vertex Parent
You can parent an object to a single vertex or a group of vertices as well; that way the child(ren) will move when the mesh is deformed, like a mosquito on a pulsing artery. In object mode, select the children and then the parent object. Tab into edit mode and select either 1 vertex or 3 vertices that define a face (or portion thereof), and Ctrl P and confirm. the line is drawn from that vertex. Now, as the mesh deforms and that parent vertex moves, the child(ren) will move as well.
Options
Move child
You can Move a child object to its parent by clearing its
origin. The relationship between the parent and child still remains.
Select the child object and press Alt O. By confirming the dialog the child object will snap to the parent's location. Use Outliner view to verify that the child object is still parented.
Remove relationship/Clear Parent
You can Remove a parent-child relationship via Alt P; see (Remove relationship). The menu contains:
- Clear Parent
- If the parent in the group is selected nothing is done. If a child or children are selected they are disassociated with the parent, or freed, and they return to their original location, rotation, and size.
- Clear and Keep Transformation (Clear Track)
- Frees the children from the parent, and keeps the location, rotation, and size given to them by the parent.
- Clear Parent Inverse
- Places the children with respect to the parent as if they were placed in the Global reference. This effectively clears the parent's transformation from the children. For example, if the parent is moved 10 units along the X axis and "Clear Parent Inverse" is invoked, any selected children are freed and moved -10 units back along the X axis. The "Inverse" only uses the last transformation; if the parent moved twice, 10 units each time for a total of 20 units, then the "Inverse" will only move the child back 10 units not 20.
Examples
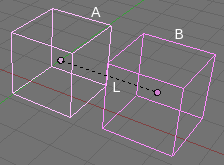
The active object, in pink, will be made the parent of all the other object(s) in the group. The center(s) of all children object(s) is now linked to the center of the parent by a dashed line; see (Parenting Example). The parent object is cube "A" and the child object is cube "B". The link is labeled "L".
At this point, grabbing, rotating, and scaling transformations
to the parent will do the same to the children. Parenting is a very
important tool with many advanced applications, as we'll see in later
chapters and it is used extensively with advanced animations.
Hints
There is another way to see the parent-child relationship in groups and that is to use the Outliner view which is described in the Ouliner window. (Outliner view) is an example of what the Outliner view looks like for the (Parenting Example). Cube "A"'s object name is "Cube_Parent" and cube "B" is "Cube_Child".
Grouping objects
Mode: Object mode
Panel: Object → Object and Links
Hotkey: Ctrl G
Menu: Object → Parent → Add to New Group
Description
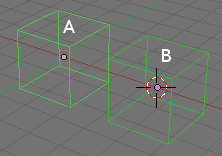
Group objects together without any kind of transformation relationship. Use groups to just logically organize your scene, or to facilitate one-step appending or linking between files or across scenes. Objects that are part of a group always shows as light green when selected; see (Grouped objects).
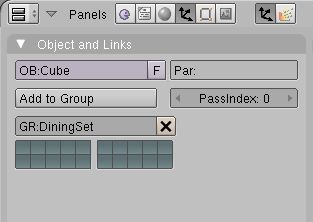
There are many ways to create a Group. The simplest is to shift-select all the objects you want to be grouped together, and then, in Object mode, click Object->Group->Add to New Group. The selected objects will now have a green groupy outline. Then, down in the Buttons window Object (F7) context, Object and Links panel, in the GR: field shift click and type DiningSet. save and close the file.
To append a group from another .blend file, consult this page. In summary, File->Append or Link->(filename)->Group-><groupname>.
Options
Adding to or Creating
Ctrl G pops up a dialog for adding to existing groups or creating new a group; see (Groups pop-up).
Alternatively, with the object selected or in edit mode, click the Add to Group button shown above in Naming a Group. The popup list allows you to click on an existing group, or create a new one.
Selecting
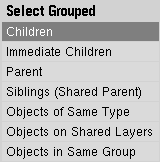
Shift G pops up a dialog for selecting objects based on grouping characteristics; see (Selected Grouped pop-up).
- Children
- Selects all the active objects' children, and the children's children, up to the last generation.
- Immediate Children
- Selects all the active objects' children but not those of the selected object's parent.
- Parent
- Selects the parent of the active object and deselects the active object.
- Objects on shared layers
- This actually has nothing to do with parents. It selects all objects on the same layer(s) of the active object.
- Objects of Same Type
- Select objects based on the current objec type.
- Objects in Same Group
- Select objects that belong to the same group as the selected object(s).
Examples
(Grouped objects) shows to cubes grouped together where A is the last selected object indicated by being drawn in a lighter color.
|


