Manual/Layers
From BlenderWiki
Contents[hide] |
Layers
Mode: Object Mode
Panel: Object → Draw
Hotkey: M
Menu: Object → Move to Layer...
Description
3D scenes often become exponentially more confusing with growing complexity. To get this under control, objects can be grouped into "layers," so that only the layers you select are displayed at any one time. 3D layers differ from the layers you may know from 2D graphics applications: they have no influence on the drawing order and are there (except for some special functions) solely to provide the modeler with a better overview.
When rendering, Blender only renders those layers selected. If all your lights are on a layer that is not selected, you won't see anything in your render except for objects lit by ambient lighting.
Options
Viewing layers
Blender provides 20 layers; you can choose which are to be displayed with the small unlabeled buttons in the header (A 3D Viewport's layer buttons.). To select only one layer, click the appropriate button with LMB ![]() ; to select more than one, hold Shift while clicking.
; to select more than one, hold Shift while clicking.
To select layers via the keyboard, press 1 to 0 (on the main area of the keyboard) for layers 1 through 10 (the top row of buttons), and Alt 1 to Alt 0 for layers 11 through 20 (the bottom row). The Shift key for multiple selection works for these hotkeys too. By default, the lock button directly to the right of the layer buttons is pressed; this means that changes to the viewed layers affect all 3D Viewports. To select only certain layers in one window, deselect locking first.
Moving objects between layers
To move selected objects to a different layer, press M, select the layer you want from the pop-up dialog, then press the Ok button. Objects can be on more then one layer at a time , to select more than one, hold Shift while clicking.
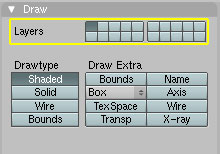
Another way to view or change a selected object layer is via the draw pane, this can be located by pressing F7 or clicking on the panel object icon as shown
You will then see the layer buttons in the draw pane, as before the object can be displayed on more then one layer by hold Shift while clicking.
Animating Layers
An Object's layer "membership" can be animated E.g. to have objects suddenly appear or disappear in a scene.
Example of layer arangement
As a suggestion, use the top row of layers for the real important things, and the bottom row for those you don't use or change often, or for alternatives for the top row. In a staged set involving mainly two actors, then, you might have, for Layers:
- 1. Lead Actor
- 2. Supporting Actor
- 3. Supporting Crew (background actors)
- 6. Main Stage
- 7. Main backdrops and panels
- 8. Main props (tables, chairs)
- 9. Little props, fillers, decorations, trappings
- 10. Cameras, Lights
- 11. Lead Actor's armature
- 12. Supporting Actor's armature
- 13: Crew armatures
- 14: alternative clothing
- 15: mesh WIP
- 16. different stage setup, dimensions
- 17. different backdrops that maybe we should use
- 18. other big props that maybe clog up the scene
- 19. props WIP
- 20. Additional lighting
Layer Naming Script
| Layer Manager script: There is also a script available that allows you to give names to layers. Link Layer Manager script |
|

