Manual/Material Options
From BlenderWiki
< Manual
User Manual: Contents | Guidelines | Blender Version 2.43
Contents[hide] |
[edit]
Materials
Mode: All Modes
Panel: Shading/Material Context → Material
Hotkey: F5
[edit]
Description
Materials can be linked to objects and obData in the materials panel, of the Shading/Material context. Here is where you can manage how materials are linked to objects, meshes, etc. and activate a material for editing in the rest of the panels.
[edit]
Options
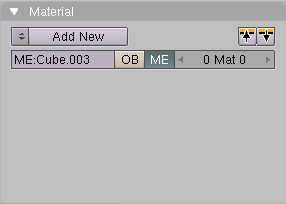
If there are no materials linked to the active object, the following options are available:
- Add New
- Add a new material and link it to the active object or object data. Like other datablocks, Blender will automatically set its name to Material.001 and so on. It's a very good idea to give your materials clear names so you can keep track of them, especially when they're linked to multiple objects.
- Select an existing material (
 )
)
- Choose an existing material from a list. If there are LOTS of materials, you will see a choice "DataSelect". Click that and one of your windows will change to a data browser window, listing all of the materials for you to choose from.
[edit]
Links and Pipeline Options
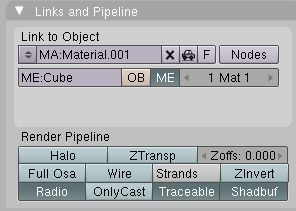
With a material linked or created, further options are available:
- MA
- (Material name,
 )
)
- Shift-click into this field to name your material
- Number of users (number field)
- The number of objects or obdata that use the material. This material is linked between the various objects, and will update across all of them when edited. Clicking this number will make a 'single user copy', duplicating the material, with it linked only to the active object/obdata.
- Auto (
 )
)
- Automatically generates a (hopefully relevant) name for the material, based on the diffuse colour
- F (Fake user)
- Gives the material a 'fake user', to keep the material datablock saved in the .blend file, even if it has no real users
- Nodes
- Designates this material to be a material node noodle, and not from the Material/Ramps/Shaders settings.
- Datablock links (
 )
)
- These two buttons determine whether the material is linked to the object or to (in this case) the mesh (or curve, nurbs, etc.). The ME button determines that this material will be linked to the mesh's datablock which is linked to the object's datablock. The OB button determines that the material will be linked to the object's data block directly.
- This has consequences of course. For example, different objects may share the same mesh datablock. Since this datablock defines the shape of the object any change in edit mode will be reflected on all of those objects. Moreover, anything linked to that mesh datablock will be shared by every object that shares that mesh. So, if the material is linked to the mesh, every object will share it.
- On the other hand, if the material is linked directly to the object datablock, the objects can have different materials and still share the same mesh. Short explanation: If connected to the object, you can have several instances of the same obData using different materials. If linked to mesh data, you can't.
- Material indices (
 )
)
- This shows how many materials you have for that obData and which one is currently active for editing. You can have multiple materials on an object and this can be done in the Editing Context (F9) in the Link and Materials Tab. See Manual/Multiple Materials for more info.
- Render Pipeline
- These toggles tell Blender where this material fits into the
Render Pipeline, and what aspects of the material are to be rendered.
- Halo - Each vertex is a halo of light
- ZTransp - Objects behind this one can shine through it
- Zoffs: A numeric input for offsetting the z-value; negative numbers puts this surface just in front of others assigned to the same mesh
- Full OSA - perform full over-sampling on this material to make it as smooth as possible where it overlays or intersects with other materials.
- Wire - render it in wireframe mode
- Strands-Colors static particles (hair, fur)
- ZInvert-renders faces inside-out
- Radio-material participates in Radiosity baking
- Only Cast - Material does not show up as a color, but just casts shadows onto other objects.
- Traceable-participates in ray tracing, if enabled during render
- Shadbuf-Can participate in shadow buffering, a faster alternative to raytracing
[edit]
Material Options
- Copy / Paste (
 )
)
- Copies the active material's settings / Pastes stored material settings into the active material
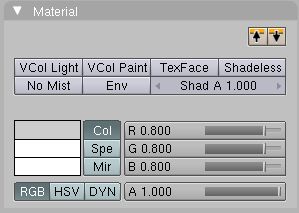
- Modes
- VCol Light: kinda like Halo, but each vertex's color is used as a light source
- VCol Paint: enables Manual/Vertex Paint
- TexFace: colors are taken from a UV Texture
- Shadeless - color is not affected by light or shadows
- No Mist - color is not obscured or faded by world mist
- Env - renders it invisible
- Shad A - this numeric control sets the Alpha value of shadows cast by this mesh, thus softening them
- Colors
- There are three colors to set:
- Col - Diffuse Color
- Spe - Specular Color
- Mir - Mirror Color.
- Clicking a color swatches brings up the color picker applet, which allows you to pick a pre-defined standard color, or click on the eyedropper to sample a color, or play with the RGB sliders, or play with the HSV box and click on a color inside the gradient. The RGBA sliders set the active color. Click Col, Spe, or Mir to activate a color settings for the sliders to set.
- Color Expression
- RGB is for Red Green Blue sliders;
- HSV changes the sliders to set Hue Saturation Value
- Dynamics
- For the Game Engine, these set up friction for the surface
|


