Manual/Modifier Stack
From BlenderWiki
Modifier
A Modifier is defined as the application of a "process or algorithm" upon Objects. They can be applied interactively and non-destructively in just about any order the users chooses. This kind of functionality is often referred to as a "modifier stack" and is found in several other 3D applications.
Modifiers are added from the Modifiers tab in the edit buttons (F9). The Modifiers tab appears when a Mesh, Curve, Surface, Text, or Lattice Object is added or selected.
Some "tools", for example the "Decimator", have been migrated from its previous location and changed into a modifier.
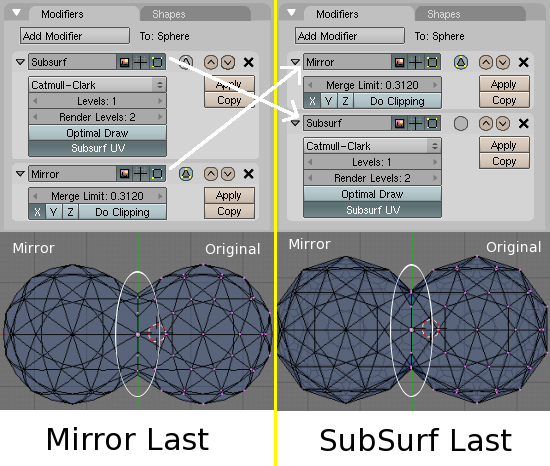
In a modifier stack the order in which modifiers are applied has an effect on the result. Fortunately modifiers can be rearranged easily by clicking the convenient up and down arrow icons. For example, (Stack ordering) shows SubSurf and Mirror Modifiers that have switched places.
The left side of the Yellow line has the Mirror Modifier as the last item on the stack. In the lower half you can see two spheres. One is a "mirror" of the other. The original sphere is on the right and the "mirror" on the left. The Mirror Modifier's Merge Limit: has been set to a value of "0.312" to cause the vertices to weld together from a greater distance. The area marked by a white circle is a suggested area to concentrate on when the stack order is changed later.
The right side of the Yellow line has the SubSurf Modifier "Switched/Rearranged" to the bottom of the stack (i.e. it has switched places with the Mirror Modifier). Now take a look at the white circle area. You can see that the results looks different than previously. This means that the stack order is very important in defining the end results. In this case the SubSurf Modifier is being applied last.
Interface
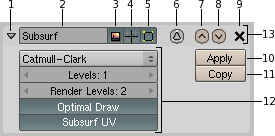
Each Modifier has been brought in from a different part of Blender, so each has its own unique settings and special considerations. However, each Modifier's interface has the same basic components, see (Panel Layout (Subsurf as an example)).
- 1 (
 ) - Collapses modifier to show only the header.
- 2 - A name for this modifier; the default is the name of the modifier itself. It is unique amongst other modifiers of the same type.
- 3 (
 ) - Shows modifier effect in the rendering view.
- 4 (
 ) - Shows modifier effect in the 3D view.
- 5 (
 ) - Shows modifier effect in Edit mode. This button may not be available depending on the type of modifier.
- 6 (
 ,
, ,
, ) - Applies modifier to editing cage in Edit mode. The icon can be Disabled, Deactivated and Activated, respectively. This icon is Cage Mode.
- 7 (
 ) - Moves modifier up in the stack.
- 8 (
 ) - Moves modifier down in the stack.
- 9 (
 ) - Removes the modifier from the stack.
- 10 (Apply) - Makes the modifier real.
- 11 (Copy) - Creates a copy of the modifier at the base of the stack.
- 12 (Sub-panel) - Sub panel for individual modifiers.
- 13 - Header area for the main modifier controls.
Every modifier features a Collapse Arrow (1) and Name Box (2). The Collapse Arrow hides the modifier's Sub-panel (12) so that multiple modifiers can be displayed without the need for excessive scrolling in the buttons window. When collapsed, only the modifier Header (13) is displayed. The Name Box can be used to give your modifiers titles, which can make recognizing their functions easier. This comes in handy in large scenes with complex modifier setups that feature multiple modifier types.
They are followed by three buttons which control the visibility of the effect in three separate contexts: Rendering (3), Object Mode (4), and Edit Mode (5). Toggling each button determines whether the modifier's result displays in each mode.
The Cage Mode (6) button is used to apply the modifier to the editing cage, which generates a more accurate display of the underlying geometry once a modifier has been applied. This displays vert/edge/face positions in their "modified" locations instead of their original locations. It should be noted, however, that transformation operations still act on the original locations of the cage vertices and not on the displayed locations. This button has three states: Disable, Activated and Deactivated. If it is Disabled then the modifier is not permitting the edit cage to changed.
The two Arrow buttons (7 and 8) control the order in which modifiers exist in the stack. Modifiers are evaluated top to bottom in the panel. The higher in the panel, the earlier it is evaluated. This can be very important depending on the application.
A great example of a situation in which positioning in the stack is important is the use of the subsurf modifier in combination with the mirror modifier as shown in (Stack Ordering) from the previous section. The mirror modifier must appear before the SubSurf modifier in the list, otherwise the original half of the object gets subsurfaced and then mirrored, which may not be what you expected.
The Delete (9) button does exactly what one would expect; it removes the modifier from the stack entirely.
The Apply (10) and Copy (11) buttons have two very different functions despite their proximity to each other. Apply evaluates the modifier as if it were the first modifier in the stack and writes the results into the mesh, in effect "baking" the result of that modifier into the object. The Copy button creates a copy of the current modifier, including its settings, at the bottom of the modifier list.
Stack
To add a Modifier you add it to the Stack. Once added they can be rearranged under most conditions.
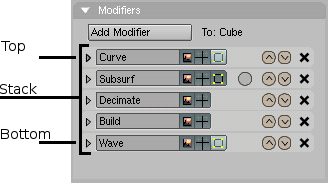
Some Modifiers can't be rearranged in the stack because they rely on certain information from the underlying Object data structure. These types of Modifiers are static in the stack and always insert themselves at the Top relative to the panel's point of view. See (Stack Example).
For example, The Lattice Modifier can not be moved from the Top because it requires the original Object data. When you attempt to move it Down in the stack you will get the error message: "Cannot move beyond a non-deforming modifier". And like wise, if you attempt to move a modifier Above the Lattice Modifier you will get the error message: "Cannot move above a modifier requiring original data".
Hence, if a modifier places itself at the Top of the stack it means the modifier requires the Original Object data, which is only available at the Top.
Some Modifiers can only be applied to certain Object types. This is indicated by the panel filtering the "Add modifier" button on the Modifiers panel. Only modifiers that can be applied are shown in the listbox button.
For example, Mesh objects can have all available Modifiers applied. But Lattice type objects can only have: Lattice, Curve, Hooks, Wave and Armature Modifiers applied.
|


