Manual/Multiple Materials
From BlenderWiki
Contents[hide] |
We normally think of an object as having a single material; a color, maybe with a little texture. This works for modeling many of the simpler objects in the real world. However, the real world is not always that simple, and some objects get very complicated. Blender allows you to have multiple materials for different pieces of a mesh. This section describes how to use the multiple material features of Blender.
To begin, make sure your 3D window is in Solid, Shaded, or Textured mode so that you can see the effects of your changes.
The Material Index
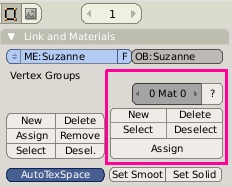
The list of materials that are assigned to a mesh is located by viewing the Editing buttons F9 in a Buttons Window on the Link and Materials tab. On that tab, the buttons used for defining and managing multiple materials are boxed in hot pink in the image to the right. These buttons show the active material name (currently blank), a Material Index display (the 0 Mat 0 ? scroller), and some action buttons labeled New, Delete, Select, Deselect, and Assign. The default panel shown to the right shows that the object Suzanne does not have any materials assigned to it, as evidenced by the 0 Mat 0 material index display.
If a mesh does not have any materials (0 Mat 0 is showing), create a quick and simple new material for the object by clicking the New button. A new material will be created and assigned to the object. It's name, "Material" or "Material.00x", will be shown above the Index display. By default, it will be grey. The Index will now display 1 Mat 1
| Meshes and Objects: You can re-use the same mesh within Blender many times to create objects. For example, you may create a mesh called "chair" and then create four duplicate objects and put them around a table. Each instance of the mesh, namely each object, may have its own set of materials assigned (one red chair, one blue chair, ...) |
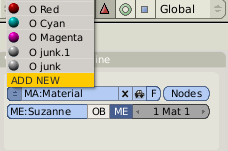
The other place the material index for an object is shown is on the Links and Pipeline panel on the Shading F5 Material Buttons window. The image to the right shows that our Suzanne has one MA:terial called "Material" assigned to it, and that it is the first of one materials assigned to her (the 1 Mat 1 index display). The select/scroll button has been clicked and is showing the list of materials in the blend file, and the ADD NEW option is highlighted. You can use this option to create a new material for the object as previously discussed in preceding sections.
Some of the mesh faces can be assigned to different index. Some of the indexes can use the same material. Changing the material settings (e.g. color) for a material will change the color of all the faces in all the indexes that use that color. To make it even more flexible (and confusing), the same Material can be used by many different meshes in your scene, so changing a material may even change the color of other meshes. In other words, be careful when changing material colors so that you don't have any unwanted effects. If you are ever in doubt, use the Outliner window to see who uses a particular material.
To make different indexes use different colors, you have to Add New materials, one for each of the indexes, as discussed below. There are three steps, and the steps can be done in any order:
- Creating Material Index slots
- Assign Faces to a Material Index
- Associate a Material with a Material Index
Assigning Material Indexes to a Mesh
An mesh can have multiple materials assigned to it, and the same material can be re-used many times for many meshes. Blender keeps track of which materials are used with which meshes by keeping a list of materials that a mesh uses. Each material is assigned an index, or slot, on the particular mesh's list.
Adding a Material Index
By clicking the New button, you create a new entry or slot on the object's list. Each time you click the New button, Blender adds the active material to the list.
| Active Material: On the Shading Material buttons panels, you are working with a particular material. The material that you are working on is called the Active Material. |
So, clicking the New button the first time, when an object that does not have any materials assigned to it, creates a new material and assigns it to the first slot. Clicking the New button the second, third, and successive times creates a new index and fills that slot with the active material.
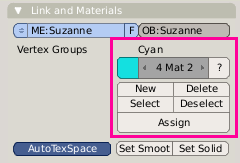
The image to the right shows our Editing F9 panel again, this time telling us that Suzanne now has 4 slots, and that we are working with the second, Cyan, as the active material. The color of the material is shown in the swatch.
To select a Material Index, use the left/right scroll arrows (shown in the image as little arrows to the left and right of the 4 Mat 2).
The main, or default material for the object is always in slot 1.
Deleting a Material Index
Take your object out of edit mode. Select the material index slot using the scroll buttons in the material Index display. To delete this index, click the Delete button. Clicking this button disassociates the material with the mesh. It does not delete the material definition from the .blend file, but simply crosses it off the list for that particular object. Any faces of the mesh that may have used that material index will be re-assigned the default material (index/slot 1).
Assigning Face(s) to a Material Index
A "face" is the part of the mesh that actually reflects color and shows the material. A mesh is made up of many faces, connected by edges with corners defined by vertices. All faces of the mesh are assigned to the first material index (x Mat 1) when the mesh was created.
With your object in Edit mode (tab),
select the faces that you want to have a particular color (material) in
the 3D window. Recall that there are vertice, edge, and face select
buttons in the window header. You can select multiple faces using Shift RMB ![]() or Border
select. Then, in the Material Index panel in the Buttons window, scroll
or ensure that the correct index is showing in the x Mat x material index scroller. Press the Assign button to assign those selected faces to the active material index.
or Border
select. Then, in the Material Index panel in the Buttons window, scroll
or ensure that the correct index is showing in the x Mat x material index scroller. Press the Assign button to assign those selected faces to the active material index.
| Keeping Track: Unlike Vertex Groups, the Material Indexes cannot be named. So, you might want to open a Text Editor window and jot down what Indexes are used for what faces. For example, 1 for base, 2 for ears, 3 for eyes, 4 for nose. |
To assign a face to a different index, simply select the face, scroll to the material you want it to show, and press Assign. The face was assigned to a different index, and that assignment is overridden to what you just specified. If you made a mistake, there's always Undo.
Changing a Material used by a Material Index
When you clicked the New button in the Material Index panel, the active material was assigned to that index. At that moment, the previous index and the new index both pointed to and used the same material. Since they both used the same material, nothing changed in your display. However, you probably want them to be different.
Use the Shading Material buttons to change the appearance of an active material that is referenced by material indexes. In the Buttons window, the Shading (F5 set), Material buttons, Links and Materials panel, use the material index Literal scroller to scroll to the index you want to be a different color. Then use the MA: material scroll/select button to Add New material. All of the faces assigned to that index will now show the new color in your 3D window.
To swap out a material on the list for another, go to the Shading Material buttons, Links and Materials panel. Use the MA: material scroll/select button to select a different material for that index (recall the panel also displays the active material in its own x Mat x index display). All of the faces assigned to that index will now have the new color.
| Material Users: In the Material select scroll box that shows all the materials in your scene, a number to the left of its name shows the number of objects that share that material. A zero means that the material is unused and readily available without affecting any other objects or faces. |
Checking your work using Select, Deselect, and Query
To see which faces have which index, in Edit mode, deselect all faces by pressing the A key once or twice. Then click the Select
button. In the 3D window, the faces that have the active material will
be selected, just as if you selected them manually using RMB ![]() .
.
If you see that a face has the wrong material assigned to it, select it using the RMB ![]() , scroll to the correct material index, and press the Select button.
, scroll to the correct material index, and press the Select button.
To see if any faces do NOT have a material assigned to them, use the Deselect button as follows:
- Select all the faces of the object (A once or twice)
- Scroll to the first material index, and click Deselect. All the faces that are assigned that index will be de-selected.
- Repeat the above step for each index.
- Any faces left are unassigned a material index.
To see the material that a face is assigned to, select the face and click the ? question mark query button next to the x Mat x Material Index display. The display will change to show that face's material index.
Some Examples
A soda can has base aluminum, but an image wrapper. The pull tab may be a colored aluminum (three indexes). A chair may have a frame and a cushion (two materials). A old-fashioned pencil has an eraser, metal holder, painted wood stylus, shaved part and graphite (five materials). Sunglasses have a frame and lenses (two materials). The computer I am writing this on has about ten. Our favorite flag (right) is one object with three materials (orange, blue and white) The white material index is the default (index 1) and is assigned to both the stars and the background.
Advanced Multiple Materials
A way of mixing materials on a mesh without using geometry for separation is shown in the Mixing Materials with Nodes tutorial.
|


