Manual/Node Editor
From BlenderWiki
Contents[hide] |
This section explains the window in general, and its header menu options. It also tells you how to enable nodes for use within Blender.
More information on where to use nodes please refer to the following pages:
To learn more about how to handle nodes themselves in general please refer to the following page:
Also there is a reference page available explaining the nodes windows and connected functions:
Accessing The Node Editor
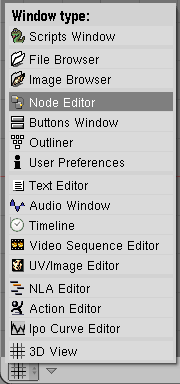
First let's enter the node editor by changing our window type to Node Editor. As shown in Select the Node Editor window, click on the window type icon and select Node Editor from the popup list. Node maps can get quite large, so use or create a big window. The window has a graph-paper style background and a header.
Each scene within your blend file can have multiple Material Node map and ONE Compositing Node map. The Node Editor window shows either map, depending on the selector position.
| Hint: You might want to add a new window layout called 6-Nodes (the list is shown on the User Preferences header at the top of your screen) comprised mostly of one big Node Editor window. My layout has the buttons window at the bottom and a text editor window on the side for me to keep notes. If you have a widescreen display (or even a regular one), you might also want to add a 3D view or UV/Image Editor window to the left side of the Node window layout, so you can work with images or your model while you're manipulating nodes. Having the 3D Preview Render panel open on top of an object is quite useful if you're tweaking material nodes. |
By default, the header, when first displayed, is uninitialized as shown:
Activating Nodes
- What nodes to use?
- If you want to work with a material node map, click the ball in the Material/Compositing node set selector. (see Node Editor Header with Material Nodes enabled.)
- If you want to work with a compositing node map, click the face on the Material/Compositing node set selector. (see Node Editor Header with Compositing Nodes enabled.)
- To actually activate nodes, click the Use Nodes button.
- The first time that you select either a Material or a Compsiting node map, the Node Editor window will be instantly filled with starter input and output compositing nodes already connected together.
Required settings for Composition
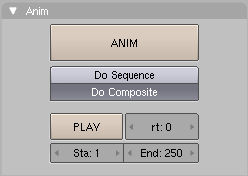
If you are compositing, you must now tell Blender to use the Node map that has been created, and to composite the image using the Node Map. To do so, click on the Do Composite button located below the Animation button. This tells Blender to composite the final image by running it through the composition node map.
From here, you add and connect nodes in a sort of map layout
to your heart's content (or physical memory constraints, whichever
comes first). But first, let's lay the groundwork by going over the
window in general and the header menu options and buttons.
Node Editor Window Actions
When the cursor is in the window, several standard Blender hotkeys and mouse actions are available, including:
- Popup menu
- Space - Brings up a main popup menu, allowing you to add, view, select, etc.
- Delete
- X or Del - Deletes the selected node(s).
- Box select
- B - Starts the bounding box selection process. Position your cursor and LMB
 click & drag to select a set of nodes.
- Cut connections (box)
- LMB
 click & drag - Starts a box selection, BUT when you let up the
mouse button, all threads (connections) within the box are broken.
 - Undo
- Ctrl Z Very helpful if you forgot to press B before box-selecting, eh?
- Redo
- Ctrl Y or Shift Ctrl Z - You can use this if you used "undo" a bit to often :)
- Select multiple
- Shift LMB
 or Shift RMB
  - Multiple node select.
- Grab/Move
- G - Moves your current selection around.
- Execute
- E - pumps inputs through the noodle, refreshing everything.
Node Editor Header
On the window header, you will see header options:
- View - to see things more clearly
- Select - to do things more clearly
- Add - to walk with...err..to add Nodes, organized by type
- Node - to do things with selected nodes, akin to vertices.
- a Material or Compositing node set selector
- a Use Nodes button
- a Free Unused button
View, Select, and Add Header Menus
These popup menus provide the basic functions:
- View
- This menu changes your view of the window, standing in for the standard keyboard shortcuts NumPad + zoom NumPad - or mouse actions.
- Select
- This menu allows you to select a node or groups of nodes, and does the same as typing the hotkey to select all A or start the border select B process.
- Add
- This menu allows you to add nodes. Please see the next section for a discusson on the types of nodes that you can add, and what they do. Clicking this menu item is the same as pressing space when the cursor is in the window
Node Header Menu
- Show Cyclic Dependencies
- C - Ok, so you've been adding and connecting nodes to your heart's content, and you haven't run out of memory yet. Selecting Show Cyclic Dependencies will show you where you have connected your threads in a circle. For example, you can easily connect a mix output as input to another node, and then connect that node's output back to the mix node input, resulting in a little circle where the image just runs round and round. Left alone, it will eventually get tired and dizzy and crash your computer.
- Hide
- H - Hides your selected nodes. Just like vertices in a mesh
- Grouping
- Most importantly, this menu option allows you to create a user-defined group of nodes. This group can then be edited and added to the map. To create a group, select the nodes you want, and then Node -> Make Group, or just use the keyboard shortcut Ctrl G. Edit the name using the little input box in the group. Groups are easily identified by their green header and cool names you have picked for them.
- Delete
- X - Deletes selected nodes.
- Duplicate
- Shift D - Makes an Unlinked copy, with the same settings as the original.
- Grab
- G - Moves the little nodes around according to your mouse, just like with meshes.
| Duplicate - Faked you out: The new copy is placed exactly over the old one. But it isn't the connected one, so playing with the controls will do nothing to your images, even though it looks like it's connected with the little threads coming out of the node that is underneath. You have to move the duplicated node to reveal the connected node beneath it. |
| Grab - Reminder Only: Just like my mother-in-law, the menu item does not actually do anything; it's just there to remind you that you can press the G key when your cursor is in the window and actually accomplish something with your life (like rearranging nodes in the window). |
Material/Composting Selector Button
Nodes are grouped into two categories, based on what they operate on. Material Nodes operate on a material in use within the blend file. To work with Material Nodes, click on the ball. When you want to work with Compositing nodes, click on the face to show the Compositing Node map.
Use Nodes Header Button
This button tells the render engine to use the node map in computing the material color or rendering the final image, or not. If not, the map is ignored and the basic render of the material tabs or scene is accomplished.
Free Unused Header Button
This button frees up memory space when you have a very complex node map. Recommended.
|


