Manual/Radiosity
From BlenderWiki
Introduction
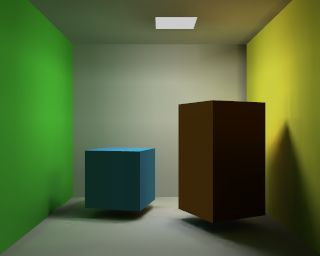
Most rendering models, including ray-tracing, assume a simplified spatial model, highly optimised for the light that enters our 'eye' in order to draw the image. You can add reflection and shadows to this model to achieve a more realistic result. Still, there's an important aspect missing! When a surface has a reflective light component, it not only shows up in our image, it also shines light at surfaces in its neighbourhood. And vice-versa. In fact, light bounces around in an environment until all light energy is absorbed (or has escaped!). Re-irradiated light carries information about the object which has re-irradiated it, notably colour. Hence not only the shadows are 'less black' because of re-irradiated light, but also they tend to show the colour of the nearest, brightly illuminated, object. A phenomenon often referred to as 'colour leaking' (Radiosity example).
In closed environments, light energy is generated by 'emitters' and is accounted for by reflection or absorption of the surfaces in the environment. The rate at which energy leaves a surface is called the 'radiosity' of a surface. Unlike conventional rendering methods, Radiosity methods first calculate all light interactions in an environment in a view-independent way. Then, different views can be rendered in real-time. In Blender, since version 2.28, Radiosity is both a rendering and a modelling tool. This means that you can enable Radiosity within a rendering or rather use Radiosity to paint vertex colours and vertex lights of your meshes, for later use.
|

