Manual/Selecting Meshes
From BlenderWiki
There are many ways to select elements, and it depends on what mode you are in as to what selection tools are available. First we will go through these modes and after that a look is taken at basic selection tools.
Contents[hide] |
Vertex, Edge and Face Modes
In EditMode there are three different selection modes. See (EditMode selection menu) for a picture of the popup menu.- Vertices mode. Press Ctrl Tab and select Vertices from the popup menu. The selected vertices are drawn in yellow and unselected vertices are drawn in a pink color.
- Edges mode. Press Ctrl Tab and select Edges from the popup menu. In this mode the vertices are not drawn. Instead the selected edges are drawn in yellow and unselected edges are drawn in a black color.
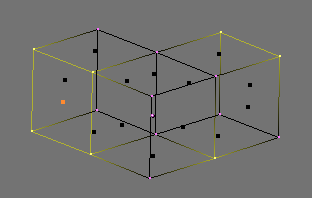
- Faces mode. Press Ctrl Tab and select Faces from the popup menu. In this mode the faces are drawn with a selection point in the middle which is used for selecting a face. Selected faces are drawn in yellow with the selection point in orange, unselected faces are drawn in black.
Almost all modification tools are availiable in all three modes. So you can Rotate, Scale and Extrude etc. in all modes. Of course rotating and scaling a single vertex will not do anything useful, so some tools are more or less applicable in some modes.
You can also enter the different modes by selecting one of the three buttons in the toolbar; see (EditMode selection buttons). Using the buttons you can also enter mixed modes by Shift LMB ![]() clicking the buttons.
clicking the buttons.
| Note: The Mode Selection buttons are only visible in EditMode. |
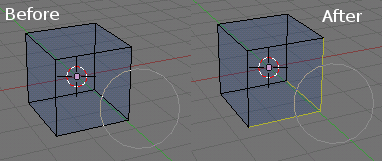
When switching modes, from Vertices to Edges and from Edges to Faces, the selected parts will still be selected if they form a complete set in the new mode. For example, if all four edges in a face are selected, switching from Edges mode to Faces mode will keep the face selected. All selected parts that do not form a complete set in the new mode will be unselected. See Vertex mode example., Edge mode example., Face mode example. and Mixed mode example. for examples of the different modes.
Point Selection
The most common way to select an element is to RMB ![]() on that item, this will replace the existing selection with the new item.
on that item, this will replace the existing selection with the new item.
To add to the existing selection hold down Shift while right clicking. Clicking again on a selected item will de-select it.
Region selection allows you to select groups of elements within a 2D
region. The region can be either a circle or rectangle. The circular
region is only available in Edit mode. The rectangular region, or Border Select, is available in both Edit mode and Object mode.
Circular region
This selection tool is only available in Edit mode and can be activated with B, B. That is, pressing the B
key twice in a row. Once in this mode the cursor changes to a dashed
cross-hair with a 2D circle surrounding it. The tool will operate on
whatever the current Select mode is. Clicking or dragging with the LMB ![]() , when elements are inside the circle, will cause those elements to be selected.
, when elements are inside the circle, will cause those elements to be selected.
You can enlarge or shrink the circle region using NumPad + and NumPad - or the MW ![]() .
.
(Circle Region Select) is an example of selecting edges while in Edge select mode.
As soon as an edge intersects the circle the edge becomes selected. The
tool is interactive such that edges are selected while the circle
region is being dragged with the LMB ![]() .
.
If you want to de-select elements either hold MMB ![]() or Alt LMB and begin clicking or dragging again.
or Alt LMB and begin clicking or dragging again.
For faces the circle must intersect the face indicators usually represented by small pixel squares; one for each face.
To exit this from this tool click RMB ![]() , or hit the Esc key.
, or hit the Esc key.
Edit Mode
Face Select Mode
In Face select mode, faces can be selected based on whether they are triangles, quads, or other. Hotkeys:
- Shift Ctrl Alt 3 selects all triangles
- Shift Ctrl Alt 4 selects all quads
- Shift Ctrl Alt 5 selects all non triangle/quad faces.
These tools are also available in both the 3D view header and Toolbox Select menus.
Rectangular or Border Select
Border Select is available in either Edit mode or Object mode. To activate the tool use the B. Use Border Select to select a group of objects by drawing a rectangle while holding down LMB ![]() .
In doing this you will select all objects that lie within or touch this
rectangle. If any object that was last active appears in the group it
will become selected and active.
.
In doing this you will select all objects that lie within or touch this
rectangle. If any object that was last active appears in the group it
will become selected and active.
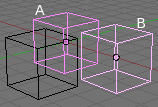
In (Start) Border Select has been activated and is indicated by showing a dotted cross-hair cursor. In (Selecting), the selection region is being chosen by drawing a rectangle with the LMB ![]() . The rectangle is only covering cubes "A" and "B". Finally, by releasing LMB
. The rectangle is only covering cubes "A" and "B". Finally, by releasing LMB ![]() the selection is complete; see (Complete).
the selection is complete; see (Complete).
Notice in (Complete) that cube "B" is also selected and active. This means that cube "B" was the last active object prior to using the Border Select tool.
Lasso region
Lasso select is similar to Border select in that you select objects based on a region, except Lasso is a hand-drawn region that generally forms a circular/rounded shaped form; kind of like a lasso.
Lasso is available in either Edit mode or Object mode. To activate the tool use the Ctrl LMB ![]() while dragging. The one difference between Lasso and Border select is that in Object mode Lasso only selects objects where the lasso region intersects the objects center.
while dragging. The one difference between Lasso and Border select is that in Object mode Lasso only selects objects where the lasso region intersects the objects center.
To de-select use Shift Ctrl LMB ![]() while dragging.
while dragging.
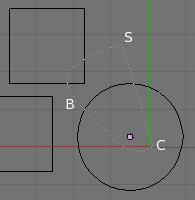
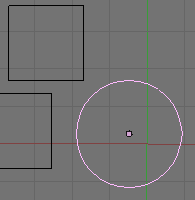
(Selecting) is an example of using the Lasso select tool. Dragging started at "S", curved around to "B" and stopped at "C". Notice that the lasso region included the circle's purple coloured object center.
(Selected) is the result with the just the circle selected even though the square was in the lasso region.
|


