Manual/Weight Paint
From BlenderWiki
Contents[hide] |
The Weight Paint
Mode is used to create and modify Vertex Groups. A vertex may not only
be a member of one or more Vertex Groups, but also may have a certain
weight in each group. The weight symbolises its influence on the
result.
Mode: Object Mode
Hotkey: Ctrl Tab
Menu: Mode Menu (Image 1)
When you change to Weight Paint Mode you see the selected object (if you have not created any groups yet), in a slightly shaded, blue color (Image 2).
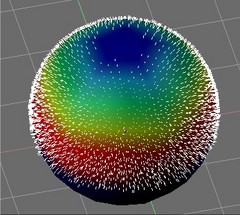
The color visualises the weight of each vertex of the currently active group. A vertex drawn in blue indicates either : a weight of zero, not in the active group, or not in any group at all.
You assign the weight of each vertex by painting on the mesh
with a certain color. Starting to paint on a Mesh will automatically
create a new Vertex Weight Group (when no group existed or is active).
If a vertex doesn't belong to the active group it is automatically
added (if the option Vgroup is not set), even if you paint with a weight of "0". The used color spectrum is shown in Image 3.
You paint on the mesh with a brush. The color only influences the vertices, neither the faces nor the edges. So don't try and paint these. There is a tool panel for the brush in the Editing-Buttons (F9) as well as in the 3D Window (press N to open it).
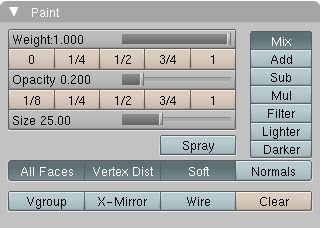
Paint-Panel
The tools in the Paint panel are sophisticated, and you can apply weight in the finest nuances. But normally you won't need all these options, and you will apply weight using a few techniques. The most used and important settings are drawn in bold.
- Weight: The weight (color) that is used to paint. The button row below contains five weight presets to paint. By default, painting works with a fixed amount relative to the previous state (like Gimp or Photoshop defaults), so you can add for example "0.2 weight" to vertices while keeping the mouse button pressed.
- Opacity: The extent to which the vertex colour changes while you are painting.
- Size: The size of the brush, which is drawn as a circle during painting.
- Spray: The Spray option accumulates weights on every mouse move.
- Mix/Add/...: The manner in which the new color replaces the old when painting.
- Mix: The new color replaces the old color. Applying more and more of the new color will eventually turn it the new color.
- Add: The new color is added to the old. For example, painting green over a red area will make it yellow, since green and red make yellow in the RGB world.
- Sub: The new color is subtracted from existing. For example, painting with green over a yellow area will make it red.
- Mul: The new color is multiplied by the old.
- Filter: Paint based on alpha value.
- Lighter: Decreases the saturation (amount) of that color
- Darker: Increases the saturation of the color
- All faces: If this is turned off, you will only paint vertices which belong to a face on which the cursor is. This is useful if you have a complicated mesh and you would paint on visually near faces that are actually quite distant in the mesh.
- Vertex Dist: Paints only on vertices which are actually under the brush. If you switch this off, all vertices belonging to faces touched by the brush are painted. If you have a sparse mesh and use subsurfaces you want to keep this on.
- Soft: This specifies that the extent to which the vertices lie within the brush also determine the brush's effect. It's extremely difficult to paint with zero then. You want to turn this off in all normal situations.
- Normals: The vertex normal (helps) determine the extent of painting. This causes an effect as if painting with light.
- Vgroup: Only vertices which belong to the active vertex group are painted. Very useful for clearing up and refining vertex groups without messing other groups up.
- X-mirror: Use the X-Mirror option for mirrored painting on groups that have symmetrical names, like with extension .R .L or _R or _L. If a group has no mirrored counterpart, it will paint symmetrical on the active group itself. You can read more about the naming convention in Manual/Editing Armatures: Naming conventions. The convention for armatures/bone apply here as well.
- Wire: Show additionally the wireframe of the objects. Since it shows the subsurfaced wire it's quite useless. It's better to use the Select-Mode (see below).
- Clear: Removes all vertices from the active group.
Tools
If you have a complex mesh it is nearly impossible to reach all vertices in Weight Paint mode. And it is quite difficult to tell where the vertices are exactly. But there's a very good and easy solution: the Select Mode.
Mode: Weight Paint Mode
Hotkey: F
Select Mode has many advantages over the normal Weight Paint mode.
- The original mesh is drawn, even when subsurface is active. You can see the vertices you have to paint over. You need to activate Vertex Colors for the mesh (Editing Buttons->Mesh Panel->VertCol->Make) to see the Weights in Select mode.
- You can select faces, only the vertices of selected faces are painted on.
- Selecting tools include:
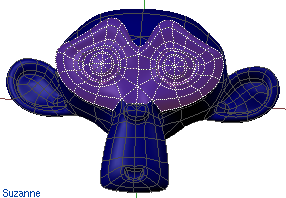
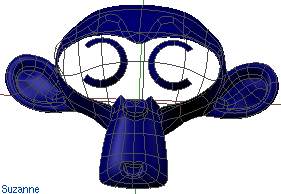
- You may hide selected faces with H and show them again with Alt H (Image 6).
To constraint the paint area further you may use the Clipping Border.
- Press Alt B and LMB
 -Drag a rectangular Area. The rest of the 3D window is hidden.
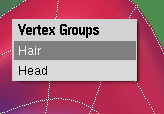
- If you want to know which groups a Vertex belongs use Shift LMB
 . You can change between the groups in the appearing Pop-Up Menu (Image 7).
- N in the 3D-window opens a Paint-panel instead of the transform properties panel (Image 8).
Scripts in Paint-Menu
- Weight Gradient:
- This script is used to fill the selected faces with a gradient (Image 3 & 9). To use the script, select the faces you wish to apply the gradient to. Click twice on the mesh to set the start and end points of the gradient. The color under the mouse will be used for the start and end blend colors, so you have to weight paint first. Holding Shift or clicking outside the mesh on the second click will blend the first colour to nothing.
- Normalise/Scale Weight:
- Maximizes weights to a user set peak and optionally scales other groups too to keep the proportion of the weights even.
- Grow/Shrink Weight:
- Uses the mesh topology to expand/contract the vert weights (works like colorbleeding).
- Clean Weight:
- Removes vertices with low weights from the current group.
Weight-Painting for Bones
This is probably the most often used application of weight painting. When a bone moves, vertices around the joint should move as well, but just a little, to mimic the stretching of the skin around the joint. Use a 'light' weight (10-40%) paint on the vertices around the joint so that they move a little when the bone rotates. While there are ways to automatically assign weights to an armature (see the Armature section), you can do this manually. To do this from scratch, refer to the process below. To modify automatically assigned weights, jump into the middle of the process where noted:
- Create an Armature
- Create a Mesh that will be deformed when the armature's bone(s) move
- With the Mesh selected, create an Armature modifier for your mesh (located in the editing buttons, modifier panel). Enter the name of the Armature
(Pick up here for modifying automatically assigned weights)
- Select the Armature in 3D View, and bring the armature to Pose mode (in the 3D View window header mode selector).
- Select a desired bone in the Armature
- Select your mesh (using RMB
 and change immediately to Weight Paint mode. The mesh will be colored
according to the weight (degree) that the selected bone movement
affects the mesh. Initially, it will be all blue (no effect).
 - Weight paint to your heart's content. The mesh around the bone itself should be red (generally) and fade out through the rainbow to blue for vertices farther away from the bone.
You may select a different bone with RMB ![]() .
If the mesh skins the bones, you will not be able to see the bones
because the mesh is painted. If so, turn on X-Ray view (Buttons window,
Editing buttons, Armature panel). While there on that panel, you can
also change how the bones are displayed (Octahedron, Stick, B-Bone, or
Envelope) and enable Draw Names to ensure the name of the selected bone
matches up to the vertex group.
.
If the mesh skins the bones, you will not be able to see the bones
because the mesh is painted. If so, turn on X-Ray view (Buttons window,
Editing buttons, Armature panel). While there on that panel, you can
also change how the bones are displayed (Octahedron, Stick, B-Bone, or
Envelope) and enable Draw Names to ensure the name of the selected bone
matches up to the vertex group.
If you paint on the mesh, a vertex group is created for the bone. If you paint on vertices outside the group, the painted vertices are automatically added to the vertex group.
If you have a symmetrical mesh and a symmetrical armature you can use the option X-Mirror. Then the mirrored groups with the mirrored weights are automatically created.
Weight-Painting for Particles
Faces or vertices with zero weight generate no particles. A weight
of 0.1 will result in 10% of the amounts of particles. This option
"conserves" the total indicated number of particles, adjusting the
distributions so that the proper weights are achieved while using the
actual number of particles called for. Use this to make portions of
your mesh hairier (is that really a word?) than others by
weight-painting a vertex group, and then calling out the name of the
vertex group in the Object Particles panel, in the VGroup: field.
|


