10.5. Raytracing Reflections
Relevant to Blender v2.37
In the past, Blender used EnvMaps (environmental maps) in order to simulate the reflectiveness of objects. But this way was a quite difficult one, needing the use of Empties (null objects) and layers when the desired result was a mere reflecting plane. Fortunately, including Raytracing in the renderer eased the whole process and helped to achieve greater realism.
 | You need to allow raytracing if you want to benefit from reflections. This is done in the Render Panel of the Scene buttons (F10): please activate the Ray button. |
10.5.1. Understanding the basics
Nothing fancy here, the principle of raytraced reflections is very simple: a ray is fired from the camera and travels through the scene until it encounters an object. If the first object hit by the ray is not reflective, then the ray takes the color of the object. If the object is reflective, then the ray bounces from its current location and travels up to another object, and so on, until a non-reflective object is finally met and gives the whole chain of rays its color. Eventually, the first reflective object inherits the colors of its environment, proportionally to its RayMir value.
Obviously, if there are only reflective objects in the scene, then the render could last forever. This is why a mechanism for limiting the travel of a single ray has been set through the Depth value: this parameter sets the maximum number of bounces allowed for a single ray.
10.5.2. The Ray Mirror buttons
For the reflections to be active at all, you need to activate, initially, the Ray Mirror button. Figure 10-27 shows parameters available for raytraced reflections, in the first block of settings.
RayMir Sets the amount of reflectiveness of the object. Use a value of 1.00 if you need a perfect mirror, or set RayMir to 0.00 if you don't want any reflection.
Depth Sets the maximum number of recursions for a single ray to be reflected. The default Depth of 2 is typically a good value. If your scene contains many reflective objects and/or if the camera zooms in on such a reflective object, you will need to increase this value if you want to see surrounding reflections in the reflection of the reflected object (!). In this case, a Depth of 4 or 5 is typically a good value.
Fresnel Sets the power of the Fresnel effect. The Fresnel effect controls how reflective the Material is, depending on the angle between the surface normal and the viewing direction. Typically, the larger the angle, the more reflective a Material becomes (this generally occurs on the outline of the object).
Fac A controlling 'factor' to adjust how the blending (between reflective and non-reflective areas) happens.
| Please note that in order to get a 'real' Fresnel effect with the current algorithm, you have to set Fresnel to 5.0 and Fac to 1.25. Nevertheless, you can play with these values for the sake of artistic freedom, if you feel the need to. |
Still having trouble understanding what the Fresnel effect is? Let's undertake a small experiment in order to understand what it is really about. After a rainy day, go out and stand over a puddle of water. You can see the ground through the puddle. Now, please kneel just in front of the puddle, your face close to the ground, and look again at a distant point on the puddle of water. The liquid surface part which is closer to you lets you see the ground, but if you move your gaze towards the other end of the puddle, then the ground is gradually masked until all you see is the reflection of the sky. This is the Fresnel effect: having a surface sharing reflective and non-reflective properties according to the viewing angle and the surface normal. In the following Figure 10-28, this behavior is perfectly well demonstrated for a Material perfectly reflective (RayMir 1.0).
Figure 10-28. Demonstration of Fresnel effect with values equal to (from top to bottom) 0.0, 2.5 and 5.0
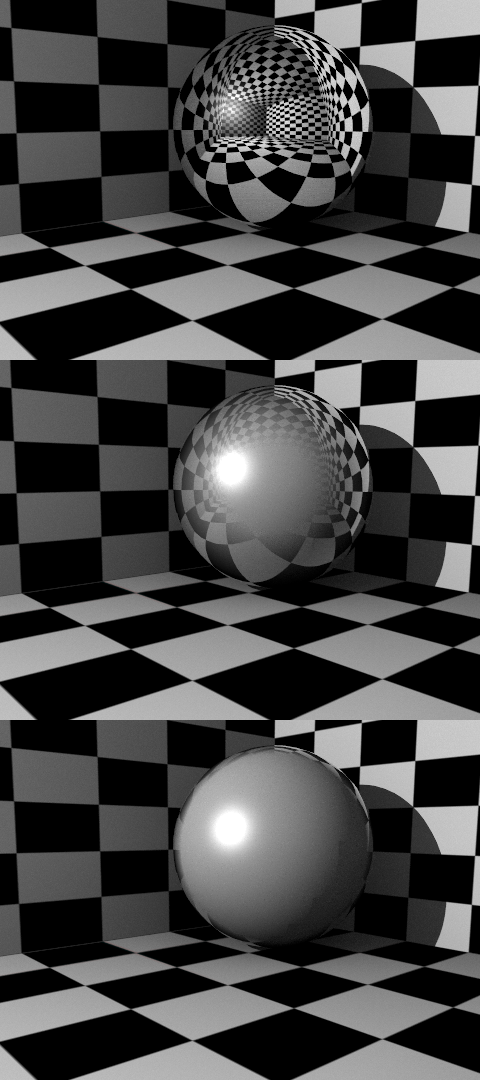
Fresnel 0.0 stands for a perfect mirror Material, while Fresnel 5.0 could stand for a glossy Material (varnished wood, for example?). It's barely noticeable but in the lower picture, the Material is perfectly reflective.
10.5.3. Colored reflections
By default, an almost perfectly reflective Material like Chrome, or a Mirror object, will reflect the exact colors of its surrounding. But some other equally reflective Materials tint the reflections with their own color. This is the case for well polished copper and gold, for example. In order to replicate this within Blender, you have to set the Mirror Color accordingly. (See Figure 10-7).