10.6. Raytraced Transparencies
Relevant to Blender v2.37
Transparency and light refraction within a transparent material are key parameters in order to get a realistic rendering of a material like solid glass.
 | You need to allow raytracing if you want to benefit from transparency. This is done in the Render Panel of the Scene buttons F10: please activate the Ray button. |
10.6.1. Understanding the basics
If you easily followed the explanation of raytraced reflections, you will have no trouble with raytraced transparencies either, because the basics are the same, apart from a few details. A ray is shot from the camera and travels through the scene until it encounters an object. If the first object hit by the ray is non-transparent, then the ray takes the color of the object.
If the object is transparent, then the ray continues its travel through it to the next object, and so on, until a non-transparent object is finally encountered which gives the whole chain of rays its color. Eventually, the first transparent object inherits the colors of its background, proportionally to its Alpha value (and the Alpha value of each transparent Material hit in-between).
But while the ray travels through the transparent object, it can be deflected from its course according to the Index of Refraction (IOR) of the material. When you actually look through a plain sphere of glass, you will notice that the background is upside-down and distorted: this is all because of the Index of Refraction of glass.
10.6.2. The Ray Transp buttons
For the transparency to be active at all, you need to activate, initially, the Ray Transp button. Figure 10-29 shows parameters available for raytraced transparencies, in the second block of settings.
You also need to set the Alpha value of the Material to a number less than 1.0 (fully opaque, 0.0 being fully transparent). Please check Section 10.3.3 in order to learn more about this parameter and its usage.
IOR Sets how much a ray travelling through the Material will be refracted, hence producing a distorted image of its background (Figure 10-30). There are different values for typical materials: Air is 1.000 (no refraction), Alcohol is 1.329, Glass is 1.517, Plastic is 1.460, Water is 1.333 and Diamond is 2.417.
Depth Sets the maximum number of transparent surfaces a single ray can travel through. There's no typical value. Transparent objects outside the Depth range will be rendered pitch black if viewed through the transparent object that the Depth is set for. In other words: if you notice black spots on the surface of a transparent object, this means that you have to increase its Depth value (this is a common issue with raytracing transparent objects).
Figure 10-30. Influence of the IOR of an Object on the distortion of the background: spheres of Water, Glass and Diamond (top to bottom).
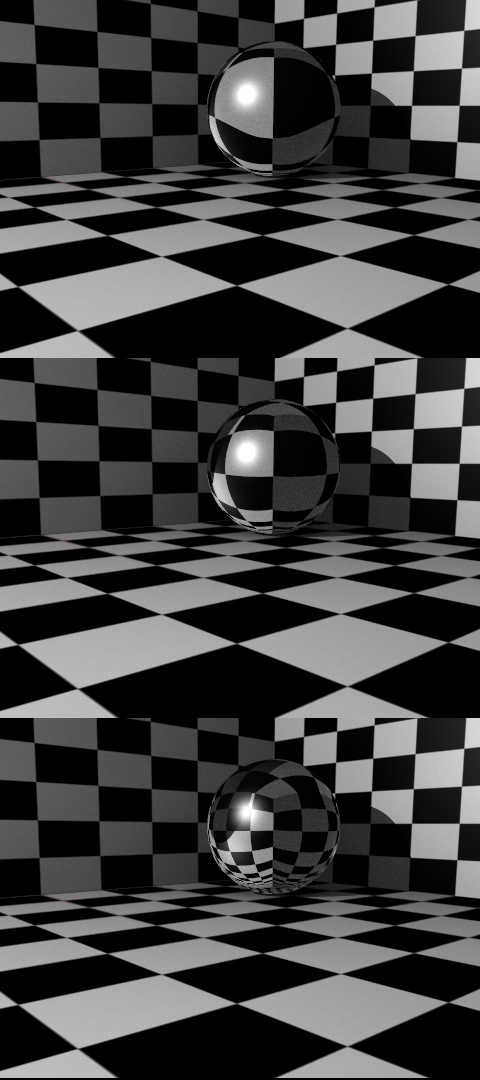
Fresnel Sets the power of the Fresnel effect. The Fresnel effect controls how reflective the Material is, depending on the angle between the surface normal and the viewing direction. Typically, the larger the angle, the more reflective a Material becomes (this generally occurs on the outline of the object).
Fac A controlling 'factor' to adjust how the blending (between transparent and non-transparent areas) happens.
| Please note that in order to get a 'real' Fresnel effect with the current algorithm, you have to set Fresnel to 5.0 and Fac to 1.25. Nevertheless, you can play with these values for the sake of artistic freedom, if you feel the need to. If you need more explanation of the Fresnel effect, please refer to Section 10.5.2, Raytracing Reflections. |
10.6.3. Raytraced transparency tip: casting transparent shadows
By default, the shadows of transparent objects are rendered solid black, as if the object was not transparent at all. But in reality, the more transparent an object is, the lighter its shadow will be. This could easily be taken into account, but there's nothing more to do with the transparent object settings. You will now have to deal exclusively with the nearby objects that will receive shadows from the transparent object!
Select the object which is to receive the transparent shadow (for example, the floor or a wall), toggle into the Shading menu (F5 key) and look at its Shaders Panel. Find and press the TraShado button. That's it! (See Figure 10-31). The transparent object's shadow is now lighter, according to the Alpha value of the Material!