Les Boutons et les Commandes (Buttons and Controls)
Bouton d'Opération :
Bouton à Bascule :
Ces boutons apparaissent sous diverses tailles et couleurs. Les couleurs vert, violet ou gris ne modifient pas leur fonctionnalité, elles permettent seulement de regrouper visuellement les boutons et d'identifier plus rapidement le contenu de l'interface. Cliquer sur ce type de bouton ne génère aucune opération, mais permet seulement de permuter un état (On ou Off).
Boutons Radios :
Boutons Numériques :
Pour modifier la valeur sur une plus large échelle, il faut maintenir LMB
Vous pouvez entrer une valeur par l'intermédiaire du clavier en maintenant SHIFT appuyée et en cliquant LMB
Edition directe des Champs Numériques
Plutôt que de maintenir enfoncée SHIFT pour éditer un champ numérique, vous pouvez éditer directement les valeurs, en cliquant au centre de la zone de texte. Cliquer sur la flèche gauche diminuera la valeur, cliquez au centre éditera la valeur et cliquer sur la flèche droite augmentera la valeur. Draguer sur le bouton augmente ou diminue la valeur.
Rappel : vous pouvez effacer le contenu d'un champ texte ou numérique en une étape avec SHIFT Backspace.
Certains boutons Numériques contiennent un « curseur » au lieu d'un nombre avec des triangles latéraux. La même méthode opératoire s'applique, sauf que les clics LMB
Boutons de Menu (Menu Buttons)

Utilisez les boutons de menu pour effectuer un choix à partir de listes créés dynamiquement. Les boutons de Menu sont utilisés principalement pour relier des DataBlocks entre eux (les DataBlocks sont des structures comme les maillages, les Objets, les matériaux, les textures, etc. ; en liant un matériau à un Objet, vous lui assignez ce matériau). Vous pouvez voir un exemple d'un tel bloc de boutons dans l'image ci-contre :
1. Le premier bouton (avec les petits triangles qui pointent vers le haut et le bas) ouvre un menu qui vous permet de sélectionner le DataBlock à relier en maintenant LMB
2. Le second bouton affiche le type et le nom du DataBlock lié et vous permet d'éditer son nom après un clic LMB

3. Le bouton X supprime le lien.
4. Le bouton Voiture génère automatiquement un nom pour le DataBlock.
5. Le bouton F (pour Fake User) spécifie si le DataBlock doit être sauvegardé dans le fichier même s'il est inutilisé (non lié).
Objets non liés (Unlinked objects) : Les données non liées ne sont pas perdues tant que vous n'avez pas quitté Blender. C'est un dispositif d'annulation (Undo) puissant. Si vous supprimez un Objet, le Matériau qui lui est assigné devient non lié (unlinked), mais est toujours présent! Vous n'avez qu'à le re-lier à un autre Objet ou appuyez sur F.
Commandes du Sélectionneur de Couleur (Color Selector controls)

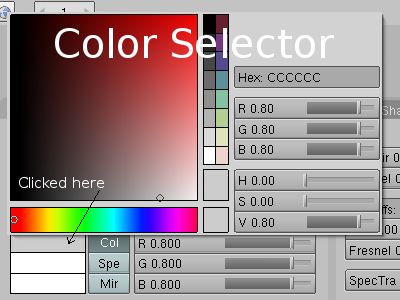
Le Sélectionneur de Couleur permet de sélectionner facilement des couleurs. Avec un clic sur la prévisualisation de la couleur (celle montrant une couleur RGB), le Sélectionneur de Couleur apparaît, avec un champ, une palette et des boutons numériques pour faire son choix.
· Cliquer dans le champ de couleurs en dégradé ou dans l'une des couleurs présélectionnées de la palette, met à jour la couleur active.
· Pour stocker la couleur active comme présélection dans la palette, maintenez enfoncé CTRL tout en cliquant dans la case voulue de la palette.
· Le bouton Color en bas au centre contient la couleur existante avant que le Sélectionneur de Couleur n'ai été ouvert cliquez dessus pour rétablir l'ancienne couleur. Le bouton Color au dessus de lui affiche la couleur actuellement active. Presser ESC assignera également la couleur.
Comme les fonctions du Sélectionneur de Couleur font parties de l'interface utilisateur de Blender, ce dernier peut apparaître à d'autres endroits.
L'exemple ci-contre montre le Sélectionneur dans un panneau flottant sur la Vue 3D. La fenêtre Transform Properties standard (N) se transforme en Sélectionneur de Couleur dans les modes Vertex Paint et Texture Paint.
Le panneau Paint dans l'éditeur UV Image l'utilise aussi.
Boutons en Cascade (Cascade Buttons)
A l'occasion, quelques boutons font
apparaître des boutons supplémentaires.
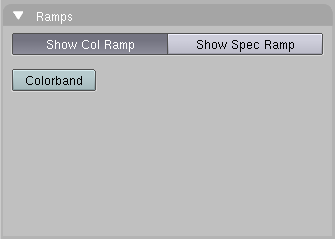
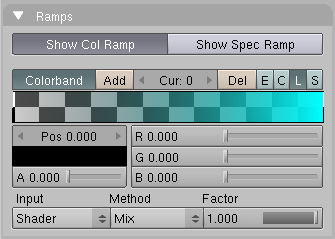
Par exemple, le panneau Ramps
possède un bouton en cascade appelé
Colorband qui fait apparaître des
boutons supplémentaires en rapport
avec la coloration de bandes
(colorbanding).
Buttons and Controls
Buttons are mostly grouped in the Button Window. But they can appear in other Windows.
Operation Button
These are buttons that perform an operation when they are clicked (with LMB ![]() , as all buttons). They can be identified by their brownish color in the default Blender scheme (An operation button).
, as all buttons). They can be identified by their brownish color in the default Blender scheme (An operation button).
Toggle Button
Toggle buttons come in various sizes and colors (Toggle buttons). The colors green, violet, and grey do not change functionality, they just help the eye to group the buttons and recognize the contents of the interface more quickly. Clicking this type of button does not perform any operation, but only toggles a state.
Some buttons also have a third state that is identified by the text turning yellow (the Emit button in Toggle buttons). Usually the third state means "negative," and the normal "on" state means "positive."
Radio Buttons
Radio buttons are particular groups of mutually exclusive Toggle buttons. No more than one Radio Button in a given group can be "on" at one time.
Number Buttons
Number buttons (Number buttons) can be identified by their captions, which contain a colon followed by a number. Number buttons are handled in several ways:
To increase the value, click LMB ![]() on the right of the button, where the small triangle is shown; to
decrease it, click on the left of the button, where another triangle is
shown.
on the right of the button, where the small triangle is shown; to
decrease it, click on the left of the button, where another triangle is
shown.
To change the value in a wider range, hold down LMB ![]() and drag the mouse to the left or right.
If you hold CTRL while doing this, the value is changed in discrete steps; if you hold SHIFT, you'll have finer control over the values. ENTER can be used in place of LMB
and drag the mouse to the left or right.
If you hold CTRL while doing this, the value is changed in discrete steps; if you hold SHIFT, you'll have finer control over the values. ENTER can be used in place of LMB ![]() here.
here.
You can enter a value directly by holding SHIFT and clicking LMB ![]() .
You can also enter simple equations, like 3*2 instead of 6. Handy
geometric constants to remember: pi is 3.14 and the square root of two
is 1.414. Press SHIFT-BACKSPACE to clear the value; SHIFT-LEFTARROW to move the cursor to the beginning; and SHIFT-RIGHTARROW to move the cursor to the end. Press ESC to restore the original value.
.
You can also enter simple equations, like 3*2 instead of 6. Handy
geometric constants to remember: pi is 3.14 and the square root of two
is 1.414. Press SHIFT-BACKSPACE to clear the value; SHIFT-LEFTARROW to move the cursor to the beginning; and SHIFT-RIGHTARROW to move the cursor to the end. Press ESC to restore the original value.
Some number buttons contain a slider rather than just a number
with side triangles. The same method of operation applies, except that
single LMB ![]() clicks must be performed on the left or on the right of the slider,
while clicking on the label or the number automatically enters keyboard
input mode.
clicks must be performed on the left or on the right of the slider,
while clicking on the label or the number automatically enters keyboard
input mode.
Menu Buttons
Use the Menu buttons to choose from dynamically created lists. Menu buttons are principally used to link DataBlocks to each other. (DataBlocks are structures like Meshes, Objects, Materials, Textures, and so on; by linking a Material to an Object, you assign it.)
You can see an example for such a block of buttons in (Datablock link buttons).
- 1 - The first button (with the tiny up and down pointing
triangles) opens a menu that lets you select the DataBlock to link to
by holding down LMB
 and releasing it over the requested item.
- 2 - The second button displays the type and name of the linked DataBlock and lets you edit its name after clicking LMB
 .
.
- 3 - The "X" button clears the link.
- 4 - The "car" button generates an automatic name for the DataBlock.
- 5 - And the "F" button specifies whether the DataBlock should be saved in the file even if it is unused (unlinked).
| Unlinked objects:
Unlinked data is not lost until you quit Blender. This is a powerful Undo feature. if you delete an object the material assigned to it becomes unlinked, but is still there! You just have to re-link it to another object or press the "F" button. |
Color Selector controls
Some controls pop-up a dialog panel. For example, Color controls, when clicked, will pop up a Color Selector dialog; see (Color Selector).
Cascade Buttons
Occasionally, some buttons actually reveal addition buttons. For example, the Ramps panel has a Cascade button called Colorband that reveals additional buttons dealing with colorbanding; see (Colorband before) and (Colorband after).


